The Importance of a Bugout Shelter For Survival
If you’re lucky enough to have a prebuilt shelter to evacuate to during an emergency, consider yourself prepped and ready.
However, there may be a situation that arises where you will be caught in an unexpected emergency where you’ll have to build a temporary shelter with only the resources you can gather from your prepper supply or from nature.
The temporary shelter you build may be a matter of life and death, so you want to be sure it offers security and provides protection from weather and serves as a comfortable home base for everyone that you’re responsible for.
12 Emergency Bugout Shelter Types
While there are dozens of temporary survival shelters you can build for a bugout scenario, it’s critical that the shelter is sturdy enough to protect you from weather, flooding, wild animals, and sometimes dangerous people. Most importantly, it must be quick and easy to build, requiring no major construction or tools.
It’s recommended that you select simple, portable, and lightweight materials that can help build a shelter should you be unexpectedly forced to flee. However, you also need to consider an unfortunate disaster event that may cause you to evacuate with only the clothing on your back. That’s why it’s important to learn how to create a shelter using only supplies that can be gathered in nature.
Here are 12 temporary bugout shelter types and shapes to consider if faced with a need to hunker down for days, weeks, or possibly longer.
Tent Shelter
A tent can make a great temporary bugout shelter because it’s ready-made. Before a disaster strikes, you should practice setting up a tent and taking it down in a calm environment. That way should an emergency arise, you won’t add the stress of struggling with building a shelter during an already stressful bugout situation.
There are so many tent kits available. Consider the different bugout situations and choose according to your needs. A bugout bag is typically filled to the brim and heavy to carry long distances. Make sure the tent is lightweight and easy-to-carry.
Poncho Shelter
So, if you don’t opt for a tent kit during a bugout scenario, consider building a poncho shelter. A poncho shelter is exactly as it sounds, not fancy but can make for a sufficient bugout shelter in an emergency. Its job will be to keep you out of the direct sunlight, dry from rain, and hopefully provide some warmth in the cold outdoors.
This temporary, portable shelter option has even been used in the military.
Supplies you will need to are an oversized poncho (the largest size you can find), sturdy rope or paracord, and stake anchors to secure the poncho to the ground. The rope is for hanging the poncho from two tree branches, creating a roof like shape. The other end of the rope gets staked into the ground. It’s not a perfect shelter option but if hung properly it can be a durable waterproof temporary shelter.
Tarp Shelter
Tarps are always recommended to add to your prepper supply whether you’re bugging in or bugging out. So, there’s a good chance that you’ll be already equipped with tarps to help you build a tarp shelter that makes for a great temporary overnight shelter during an evacuation.
In addition to approximately 6 tarps (to create a roof and sides), you will also need rope or paracord, and poles or tall sticks that you can lean against tree branches or the trunk of a tree to make a frame.
A tarp shelter is made by tying two pieces of long rope or paracord between trees. Then, drape the tarp over the top of the rope frame. Tarps typically have multiple gromets, allowing you to attach rope to help anchor it to the ground. You may also need to use rocks, stakes, or other materials to help keep the tarp steady, so it doesn’t blow away. When complete, the tarp shelter will resemble a tent structure.
Blanket Shelter
Perhaps you were not prepared with tarps but instead, you do have special emergency blankets in your prepper bugout supply. Follow the same building instructions as the tarp shelter but drape a blanket over the top instead. Emergency blankets are typically designed with one reflective side that can produce some heat within the blanket shelter. As with tarps, the emergency blanket is oversized to build a temporary shelter structure in emergency scenarios.
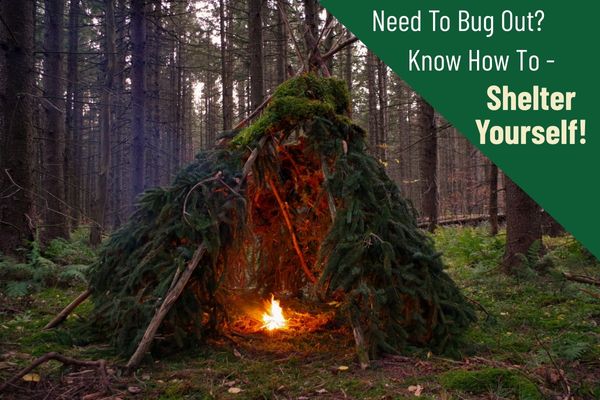
Teepee Shelter
You’ve most likely seen the clever, unique, and often colorful teepees that Native Americans are known for building. Well, the teepee shape makes for an ideal temporary bugout shelter. It’s a great go-to shelter when bugging out in nature as a teepee is a structure that you can build around a thin tree trunk. The tree trunk supports poles made out of several long straight branches that are strategically positioned around the chosen tree trunk. The teepee resembles a cone shape and the branches are set up like a camera’s tripod.
Trees For Shelter
If you’re caught out in nature with a lack of prepper shelter supplies, you will have to turn your attention and creativity to building a natural shelter. A tree shelter is one that is created below a large tree like an evergreen tree that may have shed branches and evergreen needles on the ground. Imagine the shape of a Christmas tree that with some branches removed at the bottom, can create a makeshift roof if you crawl in below the overhanging branches. It’s not the ideal shelter but it can offer some protection from the elements.
Another shelter that can be built with material from nature, would be if you stumble across large, leafy trees that overlap to provide an instant canopy of thick leaves and branches. You can also look for lower level thick vegetation such as overgrown bushes and maneuver your way into the open space between the bushes and take cover from the wind. Take it even further by covering the bushes with a tarp to make a faux roof or walls. Grab some large rocks or branches to hold the tarp down.
Caves and Rock Ledge Overhangs
Not everyone lives in a location that is near the mountains. However, if you do and bug out to a mountainous area, you can use any large crevices, shallow caves, or rock overhangs for cover. Be on the lookout for wild animals or other critters inside. Resting among the rocks will not be comfortable so add some padded materials to your prepper supply should the mountains be a place you’d consider evacuating to during an emergency.
Flat Cardboard or Carboard Box For Shelter
This may sound like a tent-like shelter you built in the basement of your childhood home when you were young, but it can work as a temporary bugout shelter. With a few pieces of extra-large cardboard, you can lean the carboard to form a teepee shape or lean it against a wall to make a shelter like structure. Obviously, cardboard is not waterproof so once again, you can drape a tarp over the cardboard to block out rain, snow, or provide some insulation. Add some duct tape to your prepper supply to help stabilize the cardboard sides.
Dug-Out Shelter
A dug-out shelter is another shelter used by the military. It’s exactly as it sounds, a shelter that is not built up but instead created by digging a hole that is wide and deep enough for you to crawl into and be somewhat comfortable. A dug-out shelter goes a few steps further because you’ll want to reinforce the side walls and add a roof with a tarp or nature materials like leaves and branches.
A dug-out shelter takes more effort than other shelters to dig out the right width and depth, but the benefit is that it will provide much more warmth than other temporary shelters.
Snow Shelters
If you live in a location that experiences snow and occasional blizzard-like conditions, you can build a temporary shelter with deep snow. A snow shelter is created by digging out the snow inside a very deep snow drift, a minimum of four feet deep. You don’t want the sleeping areas to be the lowest area of the snow shelter … that’s where the air will be coldest.
Lean-To Tree Shelter
A lean-to tree shelter is basically constructed the same as a tarp shelter except you wouldn’t have tarp and rope supplies. You’d simply use branches and leaves leaned up against a tree. The lean-to tree makes for an easy shelter to build as you simply stack and overlap multiple branches positioned against any tree at a 45-degree angle to make adequate cover. You can also add leaves to the top to create a thicker roof that could add insulation and protect you from bad weather. One suggestion is that you keep a small axe in your bugout bag to help cut branches to resemble pole-like structures.
A-Frame Shelter
An A-Frame shelter is similar to the teepee shaped temporary bugout shelter but instead of using a tree as the center pole, you will use multiple branches to form the center pole. You’ll want to use branches that will be high enough to allow you to fit underneath within the A-Frame. After you line the branches on the sides of the center pole to form an A-Shape, wrap vines, rope, or paracord around the branches until the A-shape is completely supported. The frame can offer tight protection from cold weather, rain, and wind.
Tips For Making Your Temporary Bugout Shelter More Comfortable
Regardless of the temporary bugout shelter that you build, there are some things you can do to help you feel a little bit more comfortable. Select waterproof canvas material when building shelters out of tents, ponchos, and tarps. It’s recommended that you build a bed that is off the ground a bit, even if you raise the sleeping area with leaves, branches, and other debris. Perhaps you already have hammocks in your prepper supply that can be hung from any sturdy tree branches.
Remember, you can add whatever prepper essentials that will make you and your family more comfortable in your temporary bugout shelter. Consider emergency blankets made with reflective material, sleeping bags, pillows, down jackets, and anything that meets the needs of your family.
Some preppers include foam pads with their prepper gear but if you’re caught in nature without your supplies, you can improvise using dry grass, leaves, vines, and other greenery for a makeshift bed. Styrofoam or a wood pallet are other materials that can create a floor within a temporary bugout shelter.
Don’t overlook the importance of flashlights and safe fire starters to help you stay warm, cook food, purify water, or provide added light in the dark.
Bugout Shelters: One Size Does NOT Fit All
There is no right or wrong decision when it comes to building a temporary bugout shelter. That’s because every bugout situation will be different and met with a variety of unexpected challenges. The best thing you can do is to prep now and practice building a few of the shelters listed here. That way, you’ll have the prepper knowledge and skills to build the shelter you need should an unexpected evacuation scenario arise.
Remember, the first shelter you build during an emergency needs to be built strong enough to house your family overnight or maybe a day or two. Should your temporary bugout scenario go on longer than expected, you can continue to make shelter improvements from supplies found in nature or start over and build a new, sturdier shelter.
Bugout situations are unpredictable, and all preppers need to remain calm and confidently when building a temporary shelter. Skills, creativity, and the right materials can go a long way when it comes to building a temporary shelter.